
I typically summarise all of my handmade cards in a single post each year, but I decided to make an exception this time. I recently made DIY card for Mother’s Day, which falls of May 26th in Poland. The card was a mixed-media and mixed-technique project and I tried a few things not knowing if they would work – but they did! I’m super happy with the result and thought I would share the process, in hopes it inspires someone to experiment with various methods and supplies in their cardmaking.
I had an idea to make a design depicting an envelope with flowers – in a 3D form. I most commonly make cards with quilled elements, but I have created some watercolour cards in the past as well. I have recently enjoyed working with watercolours again and I saw a great opportunity to use the paints in this card project.
And if we’re talking about making an envelope, what better opportunity could there be to finally use the wax seal stamp set that’s been sat at the bottom of my craft supplies stash, unused, for years?
Step 1 – making an envelope
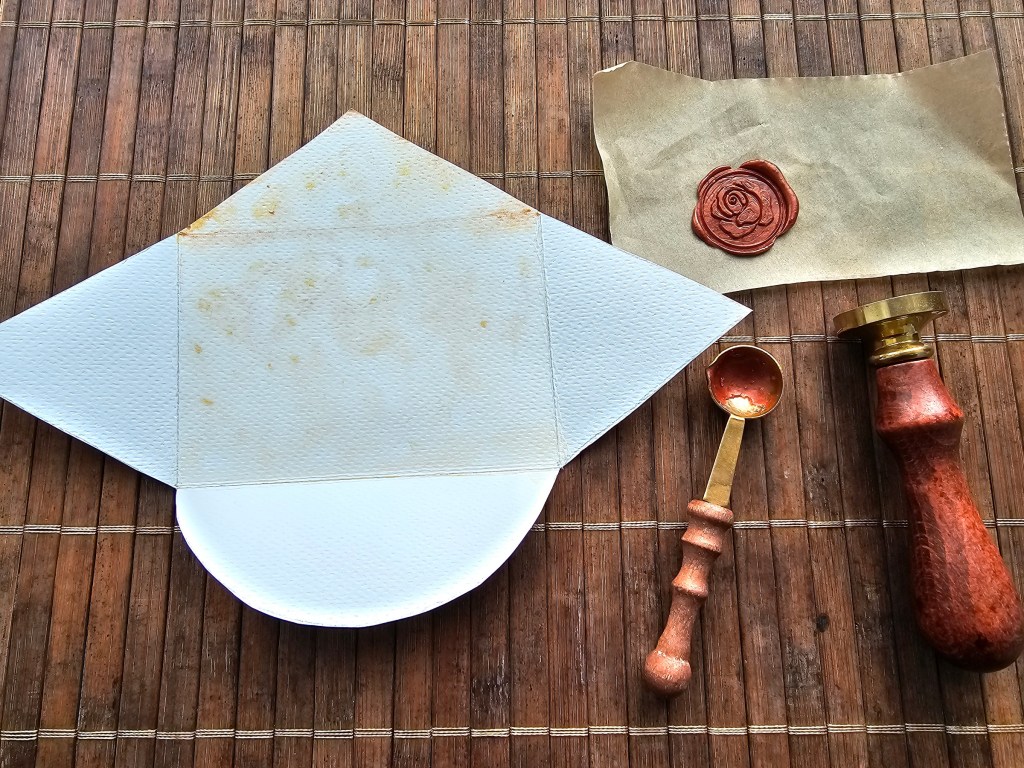
I started by designing the shape of the envelope. I experimented on plain paper before drawing the final outline on good quality, thick watercolour paper, then cut it out. I wanted to give the envelope an aged, stained look, and that’s where watercolours came in handy. I painted the cut out envelope with watercolours, using shades of orange, yellow and brown. I kept the pattern uneven, and made sure not to go too dark. You may see in the picture below that I only painted the parts that would be visible on a folded envelope – that made it easier to paint both sides without the need to wait too long for it to dry. I’m super happy with how the envelope turned out!
Step 2 – making a wax seal
Next, I moved on to making the wax seal. The stamp I have has a flower design, which was perfect for this project. Having very little experience working with wax, I didn’t want to attempt making the seal directly on the meticulously crafted envelope. It seemed like a recipe for disaster! So instead, I tried making some seals on greaseproof paper, in hopes that I’d be able to peel them off and then attach to the envelope. It turned out to be a great idea. I made a few seals on greaseproof paper and then chose the one I wanted to use.
Step 3 – making quilled flowers
Having the envelope and seal ready (though still unfolded), I moved on to what I know best – making quilled flowers. I decided to keep the whole card in warm tones and went for yellow, red, orange and pink flowers in various shapes and sizes.

Step 4 – arranging the envelope
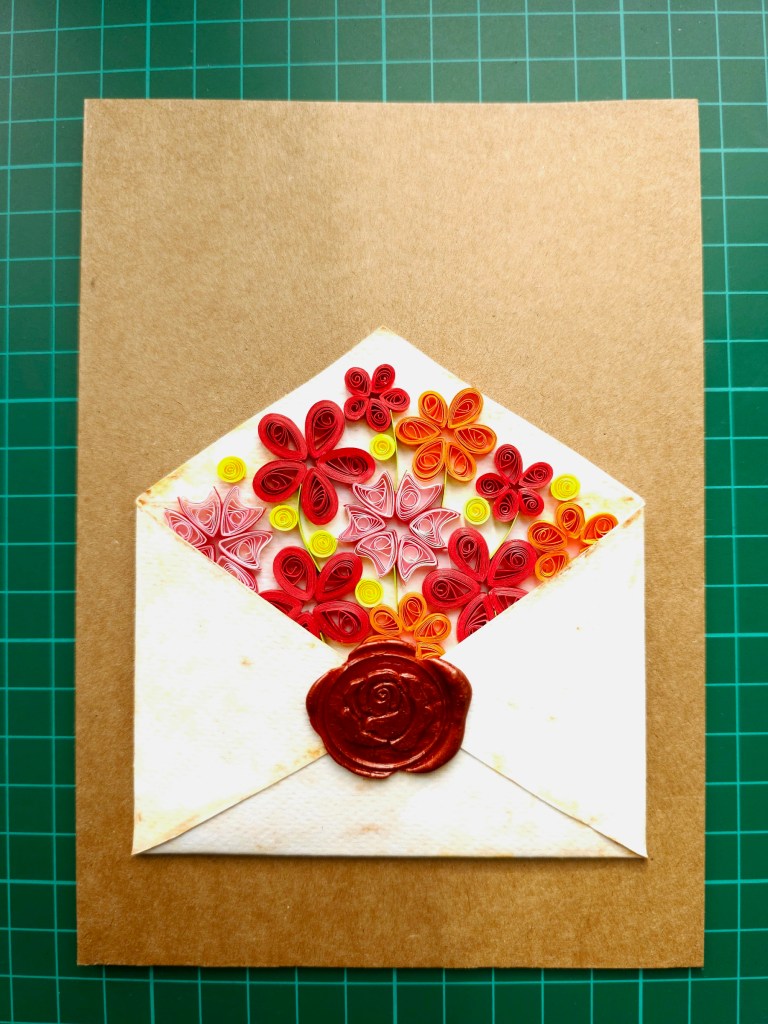
Once I had the first flowers, it was time to put everything together. First, I secured the sides of the envelope in the middle using craft glue. I made sure not to press them completely flat – I wanted the envelope to form a bit of a pocket, so I could fit some flowers inside.
Then, I attached the wax seal in the middle. I did that by pouring a few tiny drops of melted wax onto the paper and then immediately pressing the pre-prepared seal onto the fresh wax. I experimented with this method beforehand with spare seals and scraps of paper to make sure it would have a good hold without ruining the design on the seal.
Then, it was time to fill the envelope with some of the DIY quilled flowers.
Step 5 – final details
I attached the envelope to brown recycled paper card blank and added a few final flowers sticking out of the envelope, blending the design with its background. And just like that, the envelope with quilled flowers handmade card was finished! I’m super pleased with how it turned out. It was so much fun working on this project, being able to use various supplies and techniques.

Also see:


One thought on “DIY Handmade Card – Envelope With Quilled Flowers”