
Hey there, crafty pals! With Valentine’s Day just around the corner, it’s the perfect time to add a personal touch to your celebrations. Today, I’m sharing not one, but two DIY watercolour heart cards that will have your loved ones swooning. Grab your brushes and let’s dive into the colourful world of handmade cards!
Card 1: The Splatter Heart
Materials needed:
- Thick paper for heart stencil
- Watercolour paper card blank
- Watercolour paints
- Masking tape
- Thin pen for outlining
Steps to make a watercolour splatter heart Valentine’s card:
1. Create a Heart Stencil:
Cut out a big heart from a sheet of paper. Note that it’s not actually the heart that we will need, but the hole left after cutting it out! Pro tip: Use thicker paper to avoid paint bleed-through.
2. Secure the Stencil:
Place the paper with the heart-shaped hole on top of your watercolour card blank, securing both with masking tape. This ensures your heart stays put during the artsy chaos.

3. Splash on Some Colour:
Time to get messy! Splash different colours of watercolour paint onto the paper. Don’t be shy – let the hues mingle and dance.

4. Reveal the Magic:
Peel away the stencil paper to unveil a watercolour masterpiece underneath. Oh, the joy of surprises!
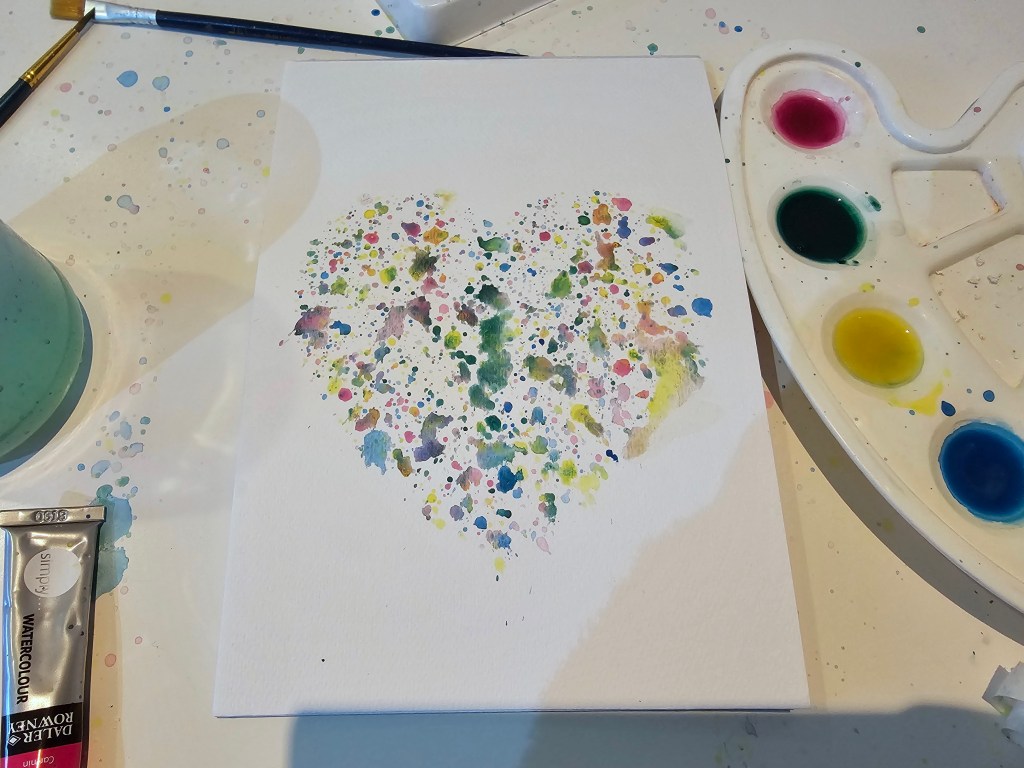
5. Add the Finishing Touch:
Outline your heart with a thin pen, giving it that crisp, defined look. A black outline works wonders against the vibrant watercolours.

Improvement ideas
Whilst the final result looked quite cool, I wasn’t entirely happy with how it turned out. Here are a few learnings I made in the process:
- Upgrade the Stencil: Use thicker paper to block out the shape. Thinner printer paper had me sweating about potential paint leaks. Safety first, folks!
- Play with Monochromatic Hues: Experiment with a more monochromatic design using a few hues of the same colour. It’s all about finding your colour vibe.
- Patience is a Virtue: Let each colour dry before introducing the next. It’s like building layers of love – one hue at a time. I was impatient and didn’t wait, and it led to the paper getting excessively wet, and paints blending together.
Here is my second attempt to make this card, this time with the improvements applied.


Card 2: Hearts in Harmony
Materials needed:
- Blank watercolour paper card
- Ruler and soft pencil
- Watercolour paints
- Black pen
- Soft eraser
Steps to make a watercolour hearts grid Valentine’s Day card:
1. Create a Grid:
Draw a grid on your watercolour card using a ruler and a very soft pencil. Precision is the name of the game.

2. Paint the Love:
Fill each square of the grid with your chosen colours. Pink, blue, green, purple – let your heart’s palette shine.


3. Sentence and Accent Heart:
Write a sweet sentence using a black pen. Paint a standout red heart to steal the spotlight.
4. Eraser Magic:
Gently remove the grid with a soft eraser, revealing a seamless array of love-filled hearts.

Happy Valentine’s Day crafting!
So, there you have it, folks – two DIY watercolour heart cards to sprinkle some handmade magic into your Valentine’s Day. Get your creative juices flowing, and let’s make this celebration a masterpiece of love!
Also see:


One thought on “Simple DIY Valentine’s Day Cards – Watercolours”