
In today’s episode of learning to crochet from zero to hero, I’d like to share with you my most elaborate project so far. I bought an affordable crochet set for making a cute gingerbread man toy, wanting to challenge myself with techniques I haven’t tried before. It wasn’t a smooth journey all along, and I did make significant mistakes along the way. But, I also learnt several valuable lessons and will now approach future projects armed with additional knowledge. Despite his flaws, I still think that this crocheted gingerbread man turned out adorable and I did quite well. What’s even better, I completed it in just three evenings!
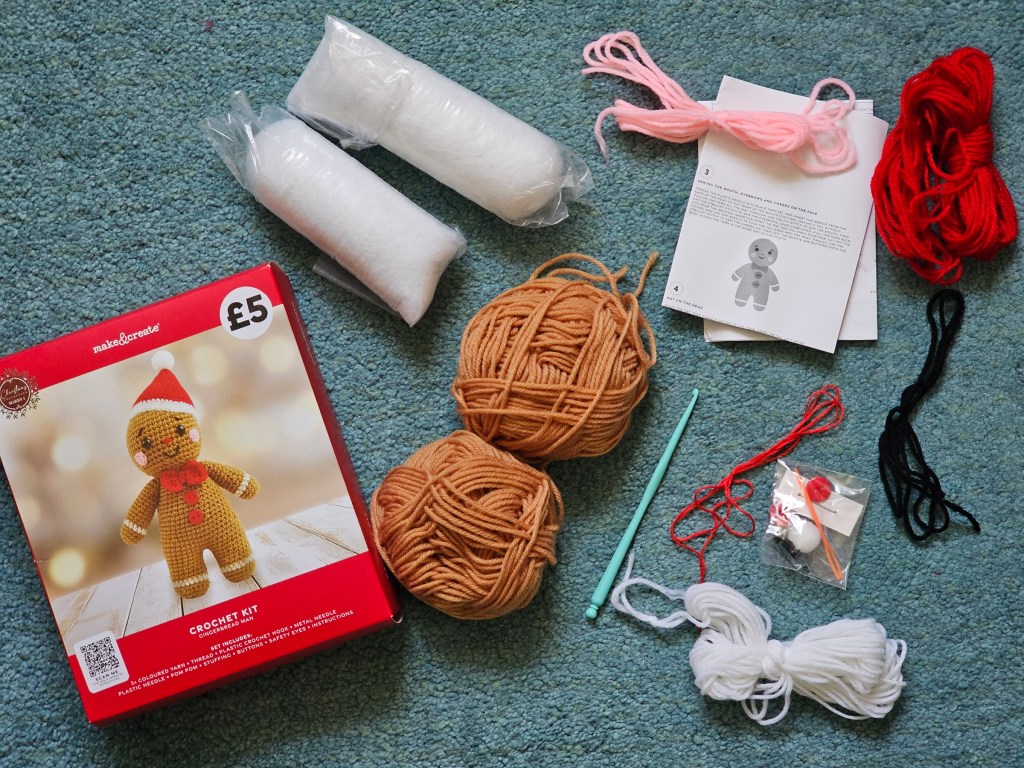
Contents of the set
I bought this crochet set in the Works (a popular British chain hobby/stationery store) – it cost £5. In the box, there were two balls of light brown yarn and shorter pieces of white, pink, red and black yarn. There was also a a plastic tapestry needle, a small sewing needle, two safety eyes, two red buttons, a white pom pom and red thread. Finally, there were also two bags of toy stuffing, a plastic crochet hook, and a leaflet with the pattern.
Now, I need to mention two things.
First of all – the plastic crochet hook included in the box wasn’t my favourite. In fact, I had previously worked on a couple of other projects by the same brand, and I really hated that plastic hook. So, I decided to instead use one of my metal hooks. Unfortunately, the crochet hook in the set wasn’t labelled, and I had to eyeball its size. It was between 3mm and 3.5mm, but it seemed closer to 3,5mm, and that’s what I went with… It came to bite me later, but we’ll get to that.
Second of all, there was a QR code on the box with a note to scan it to get updated instructions. And fair enough, the pattern I got directed to after scanning the QR code was slightly different than the one on the leaflet in the box. I followed the supposedly updated instructions from the QR code.
Starting off – crocheting the head of a gingerbread man
The first step of crocheting a gingerbread man was to make the head. It was quite simple, really. The whole pattern was made of single crochets and basic increases and decreases. Before I finished the final rounds, I attached the safety eyes and started stuffing the head. I finished stuffing it before the last round, and soon enough, I had a fairly even crocheted ball with black eyes.


Crocheting legs and arms
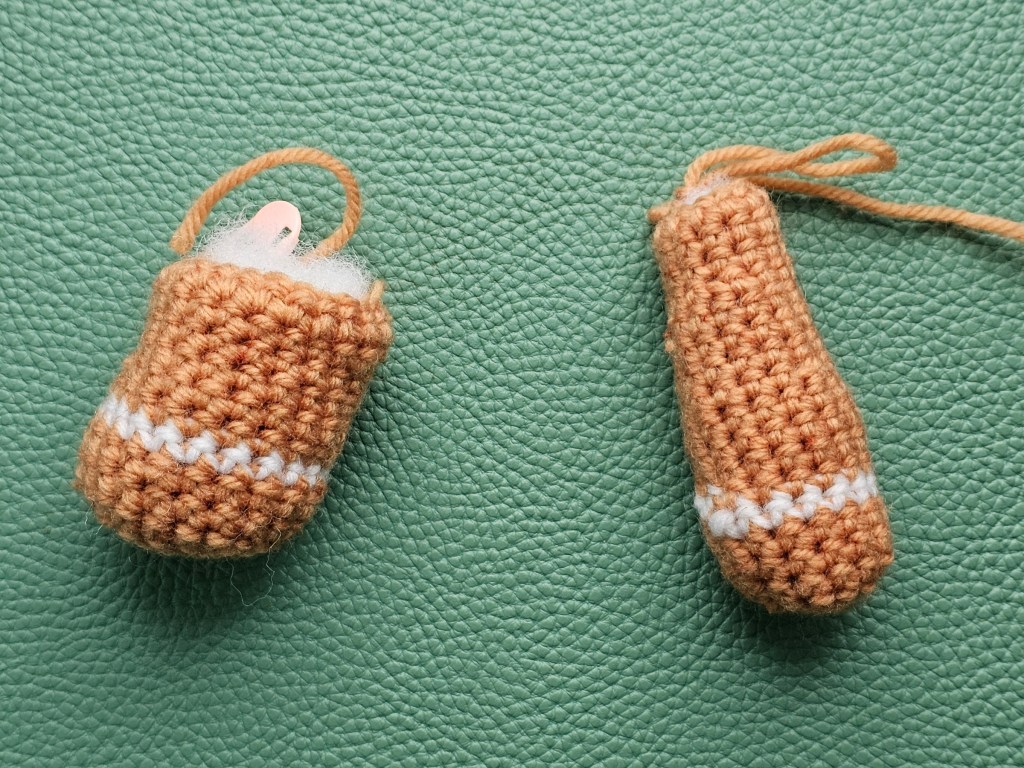
Then, I moved on to crocheting the gingerbread man’s limbs. I made one leg and one arm, to check if there’s anything challenging or surprising in those patterns. There wasn’t, really, and I had one of each ready in close to no time. At that point, however, I started getting concerned about the amount of brown yarn I had left. I decided to move to the main part of gingerbread man – the body with the second leg – and leave the final arm for the end.
Crocheting the body of the gingerbread man
Now, this was the confusing bit. I wasn’t quite sure how two separate legs were supposed to be joined into one piece. The instructions simply showed the two legs next to each other, with one chain in between.
Eventually, I got it. First, I had to make one leg and fasten off the yarn.
Then, I had to make a second leg, but this time, without finishing it. After completing the final round, I had to make one chain (counting as the start of next round), then immediately crochet into the second leg, go around it in a full circle, then crochet into the joining chain, and go around the first leg. Phew. After that, the legs were attached together, and I had a full round of stitches starting the gingerbread man’s stomach.
Now, this is when I realised a major, major mistake. When crocheting the arm and the legs, I didn’t turn them the right side out. I have no idea how I didn’t realise how awkward it was to stich around the small pieces inserting the crochet hook from the inside. Argh! Well, at that point, I wasn’t frogging anything. I’ve come too far! A crochet expert will easily see that my gingerbread man’s body is inside out, but honestly, I think most people won’t realise. And either way, it’s just my beginner project, I ain’t selling or gifting it to anyone.
Having the first round of the gingerbread man’s body in place, crocheting the rest was a breeze.

Paying for my actions
Once I finished crocheting the body of the gingerbread man, I had to accept the consequences of my choices. Choosing to use a crochet hook ever so slightly bigger than the one included in the set meant that I was using slightly more yarn on each stitch. And unfortunately, I ran out before I was able to complete the whole project.
I started crocheting the remaining arm – the final piece requiring the brown yarn – and ran out of yarn with about 2/3 of the arm left to crochet. So close, yet so far.
At that point, I was fully committed to finishing the project. Despite all the mistakes I made on the way, it was the most elaborate project I’ve ever worked on, and I was doing relatively well. So, I accepted that my actions had monetary consequences. I went back to the shop and got a second, identical set, just to get a bit more of the brown yarn. The shop doesn’t carry individual balls of yarn, and I didn’t think I could get a good colour match elsewhere. Oh well. At least it wasn’t too pricey – the whole box was £5. Maybe I can use the remaining bits from the second set to crochet another gingerbread man, this time using a hook smaller than the one in the set. It should use up less yarn, right?
Crocheting the cheeks
This part of the pattern was by far the easiest – just one round of stitches in a magic circle. In just a few minutes, I had two cute pink cheeks ready. I left long tails of yarn to use them later to attach the cheeks to the face of the crocheted gingerbread man.

Crocheting the hat
Crocheting the hat was plain sailing – just a magic circle with rounds of single crochets, followed by a simple colour change. But, it taught me the difference between making 6 or 3 stitches in the magic circle. Now, I understand how the shape of a crocheted piece can be flat or conical, depending on the number of stitches. Valuable lesson for a beginner! I had never needed to crochet a cone before, so that was new.

Crocheting the bow
The bow was the second – after joining the legs into the body – slightly confusing part of the pattern. I’m still not convinced it looks like the photo on the box… but I think it’s close enough?

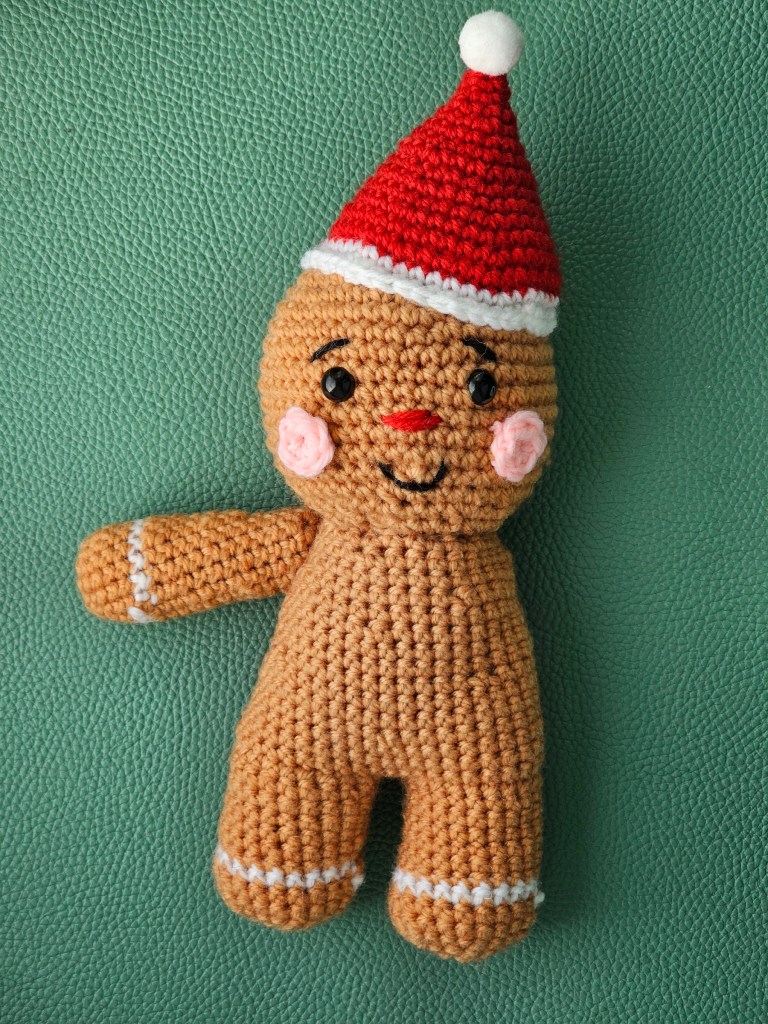
Assembling the crocheted gingerbread man
Finally, it was time to assemble everything together.
First, I attached the head to the body. The body had an open end at the top – it didn’t finish into a pointy, closed top – and it was fairly easy to connect it to the head with a tapestry needle (I used one of my metal ones instead of the plastic one from the set).
Then, I attached the pink cheeks, using the photo on the box as guideline. Next, it was time for the part I was dreading the most – embroidering the face. I’m rubbish at embroidering on crocheted pieces! However, I actually think it turned out pretty cute this time. Phew! I embroidered the mouth, eyebrows, and the nose.
I then moved on to attaching the pom pom to the hat. The instructions said to use a glue gun, but I used white sewing thread and a thin needle. I think it’s firmly in place! Then, I stuffed the hat and sewed it onto the head at an angle. The gingerbread man was starting to look adorable!
I then attached the first arm. It was only after I’d fastened it off that I realised that the start/end of the white row was visible in the front. Ahhh! At that point, the poor gingerbread man was so full of mistakes, I decided to just leave it. But now I will forever remember to check the positioning of my pieces before sewing them on, so that’s still a valuable lesson learnt.
Finally, it was time to attach the second arm, bow, and buttons. My most elaborate project to date was finished!


Final thoughts
I can’t get over how adorable this crocheted gingerbread man turned out! Far from perfect due to the countless mistakes (I still can’t believe I crocheted most of it inside out), but honestly, if you’d showed me a picture of my finished gingerbread man a year ago and told me I’d be able to make it, I wouldn’t have believed you! Realistically, it’s only my 10th or so crochet project, and I feel like I’ve come a long way. Learning how to connect two legs into one, uniform body opened an ocean of possibilities for me! Despite the flaws, I will cherish this piece forever. It goes to show that with a little practice, everything is possible.
Also see:


