Today, I’m bringing you a cross stitch guide for beginners – the type of guide I would have loved to have when I first started cross stitching. In this post, I will cover everything you need to know to successfully complete a cross stitch project. I’ll take you through the various tools used for cross stitching, I’ll show you how to prepare the thread for sewing and how to place the first stitches. I will also cover the most commonly made mistakes and give you ideas for the best cross stitch projects for beginners. If you’d like to start cross stitching but aren’t sure how to start – this post is just for you!
- Cross stitching tools
- How to start cross stitching
- Most common cross stitching mistakes
- The best cross stitch projects for beginners
- Happy stitching!
Cross stitching tools
First, let’s have a look at the most popular cross stitching tools.
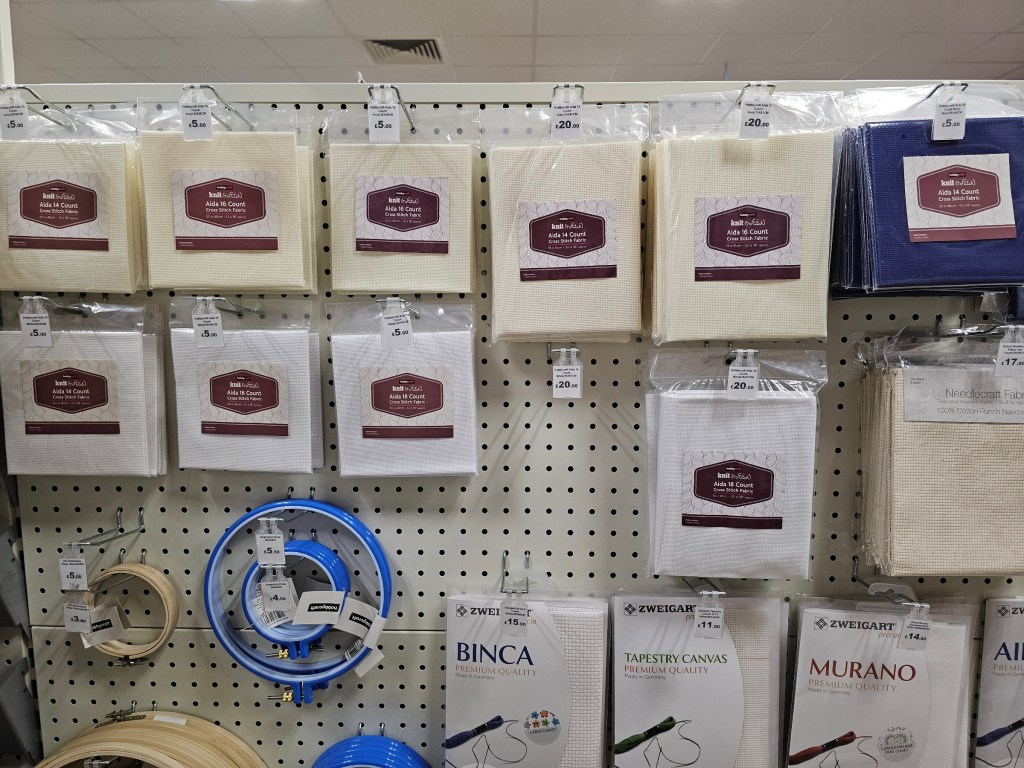
Aida – canvas
In theory, you can cross stitch on any fabric. Realistically, though, it’s rather difficult to sew perfectly even rows of crosses on regular fabric. That’s why we have aidas – canvases designed specifically for cross stitching.
An aida is a type of fabric made of threads that form lines of rows and columns with small gaps in between. Those gaps create an even grid, perfect for cross stitching.
Aidas come in different sizes and varieties. You’ll typically find them labelled as 10ct, 12ct, 14ct and so on. The number indicates how many cross stitches will fit in one inch of the aida, in one row. On a 10ct aida, a line of 10 stitches will be exactly 1 inch long. On a 14ct aida, a line of 14 stitches will be 1 inch long. The smaller the count number, the larger the sewn crosses will be.
You can find aidas in various colours, but sometimes, it may still not be good enough for your project. For example, if you want to cross stitch a small design onto a T-shirt, you probably don’t want to have to sew a large piece of aida onto your piece of clothing. It wouldn’t look very nice! Luckily, you can find water-soluble aidas, great for sewing cross-stitch designs onto other fabrics. You can place such aida on a T-shirt and sew the cross stitch design through both fabrics, using the aida to keep the stitches even. Then, you just need to soak the T-shirt in water, and the aida will disappear, leaving a perfectly even cross stitch design on your T-shirt.
Thread
Embroidery thread typically comes in skeins a few metres long. The thread is typically made of 6 thin strands. You have to look closely to realise!
When you start a cross stitch project following a diagram from an assorted kit or found online, make sure to check how many strands of thread to sew with. I’ve never seen a cross stitch project that called for using the thread with all 6 strands. Usually, you need to separate the thread into groups of 2 or 3 strands before you start sewing. Some projects may even use different thread setup for different areas of the design – always make sure to fully read the instructions before you start sewing!
To learn how to correctly use the thread for cross stitching, scroll to the step by step guide below. You’d be surprised how many mistakes can be made there!
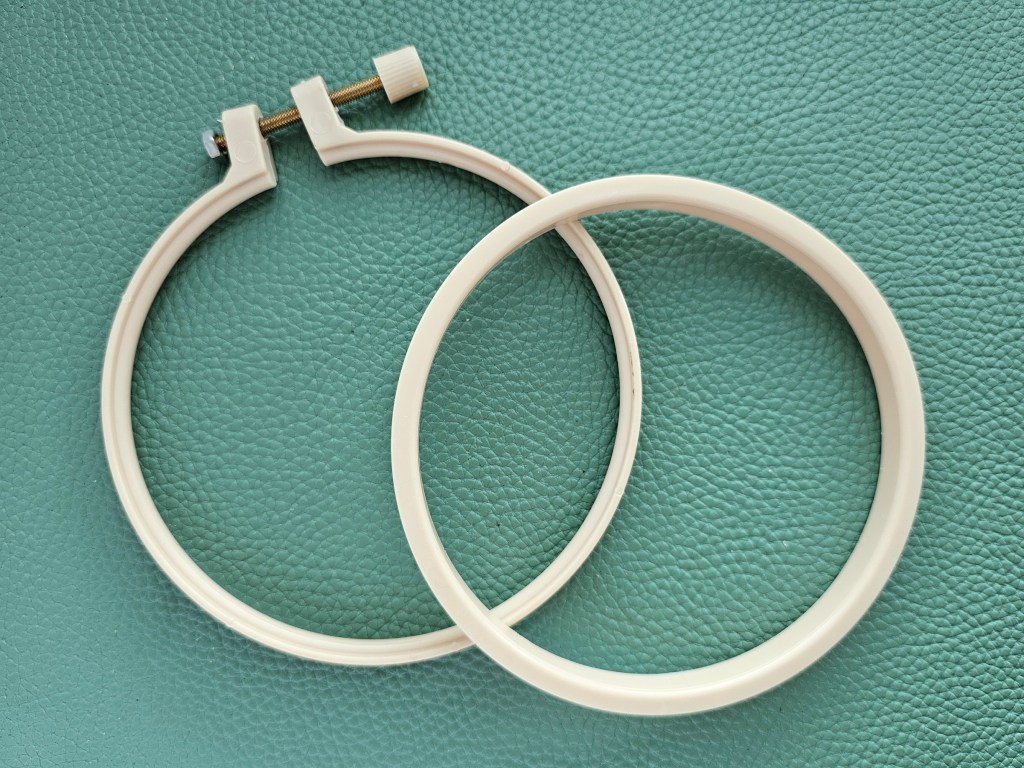
Embroidery hoop
You don’t need a hoop to start cross stitching, but it certainly makes the process more comfortable. Embroidery hoops keep the canvas stretched out, which helps speed up the sewing.
Embroidery hoops may be wooden or plastic. They come in different sizes too. Small ones are handy for small projects, whilst bigger hoops might be more useful for larger designs.
Mounting the canvas on the hoop can be a bit tricky. Scroll down for more detailed instructions!

Needles
I find that cross stitching needles are often quite blunt, which is fine – the canvas already has holes and you don’t need the needles to pierce through many layers.
Generally speaking, you can use any sewing needles for cross stitching, just make sure that the needle has a big eye. Some sewing needles have tiny little holes, and embroidery thread made of a few strands is thicker than standard sewing thread.
Threader
A threader isn’t an essential tool for cross-stitching, but it certainly helps! As the name suggests, a threader helps to thread a needle. If you struggle pulling the thread through the needle, a threader will speed up the process. There are various types of threaders, and even some assorted cross stitch kits come with one. It may be a small and simple tool, but I really recommend getting one.
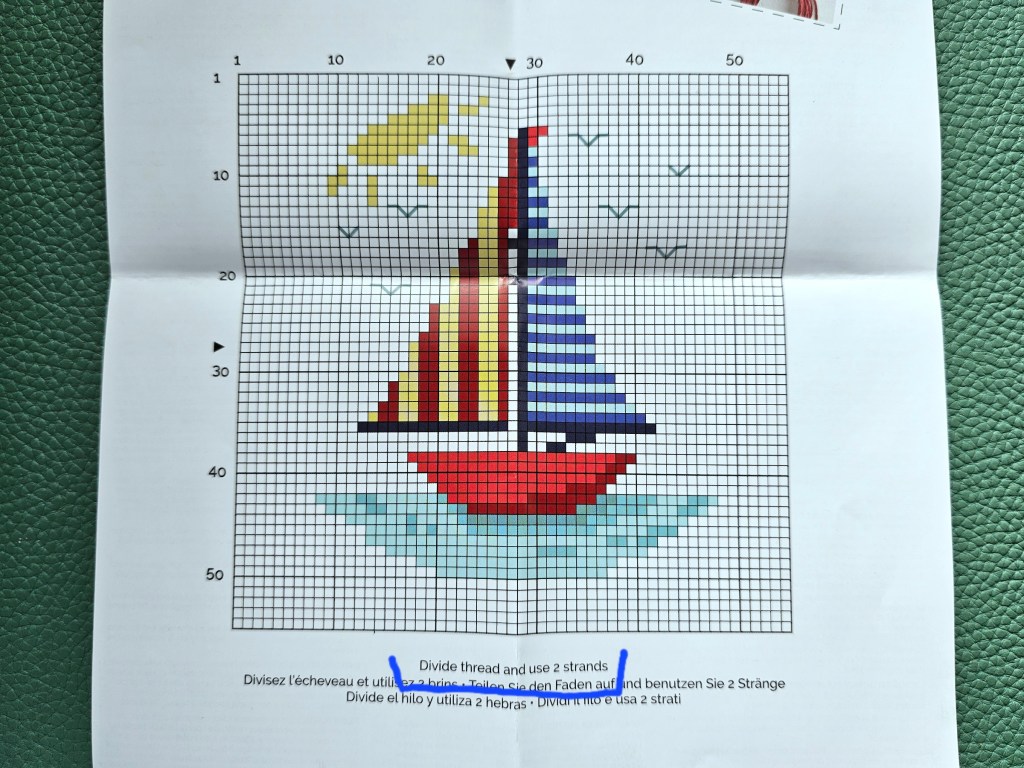
Diagram with the design
And finally, in order to cross stitch, you need a diagram with the design – unless you want to freestyle it as you sew.
You can buy cross stitch designs in craft stores, but there are also plenty of free patterns online. If you’re feeling creative, you can even design your own pattern. I recommend drawing it digitally or on a piece of paper, by filling a grid of square cells. Even if you’re feeling confident, it’s a good idea to visualise the pattern before you start stitching.
How to start cross stitching
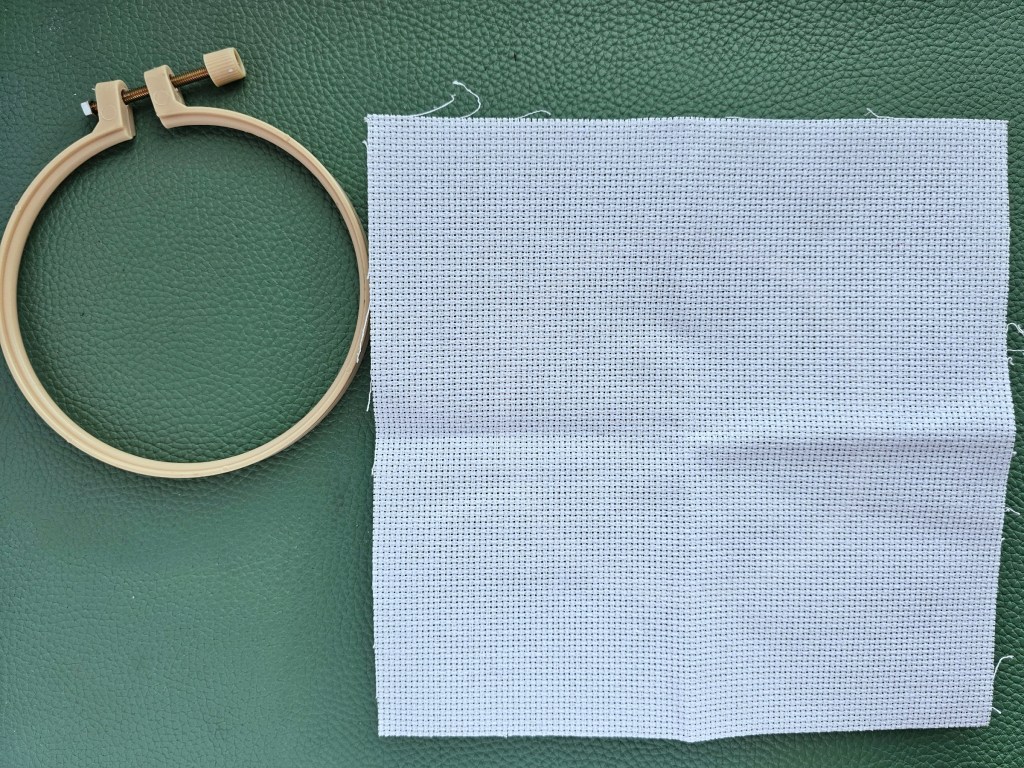
Mounting the aida on the embroidery hoop
If you have an embroidery hoop, it certainly helps to use it when cross stitching. Mounting the aida on an embroidery hoop can be a bit tricky – it requires some patience.
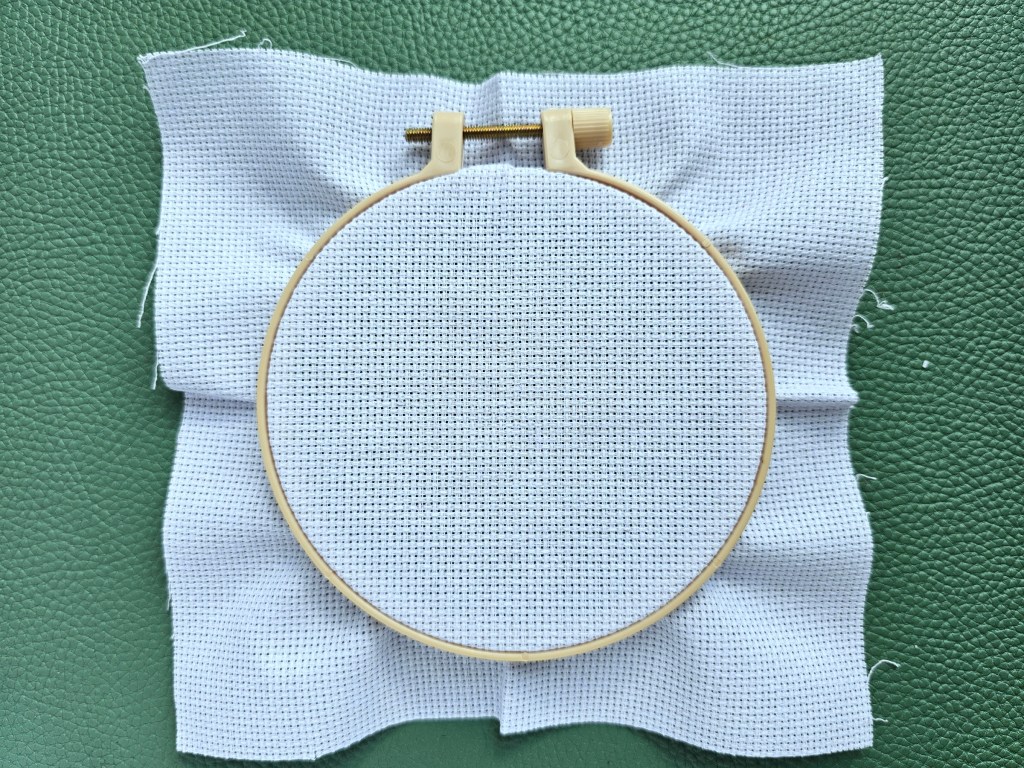
You’ll find that embroidery hoops typically have a screw which tightens the outer loop. Loosen that screw to take the embroidery hoop apart.
Ideally, try to loosen the screw as much as possible, but without letting it completely pop out of the other side.
Place the inner hoop on a flat, hard surface. Next, place the aida on top of that hoop. Align the centre of the aida with the centre of the hoop.
Then, carefully place the outer hoop on top of the aida, aligning it with the inner hoop underneath. Now comes the tricky part.
Push the top hoop down, forcing it around the hoop underneath. It might require a little bit of force and a good deal of precision – you don’t want the bottom hoop to slide. Make sure that the inner and outer hoop are aligned and the inner hoop is fully wrapped by the outer one. Tighten the screw to secure the fabric on the embroidery hoop.

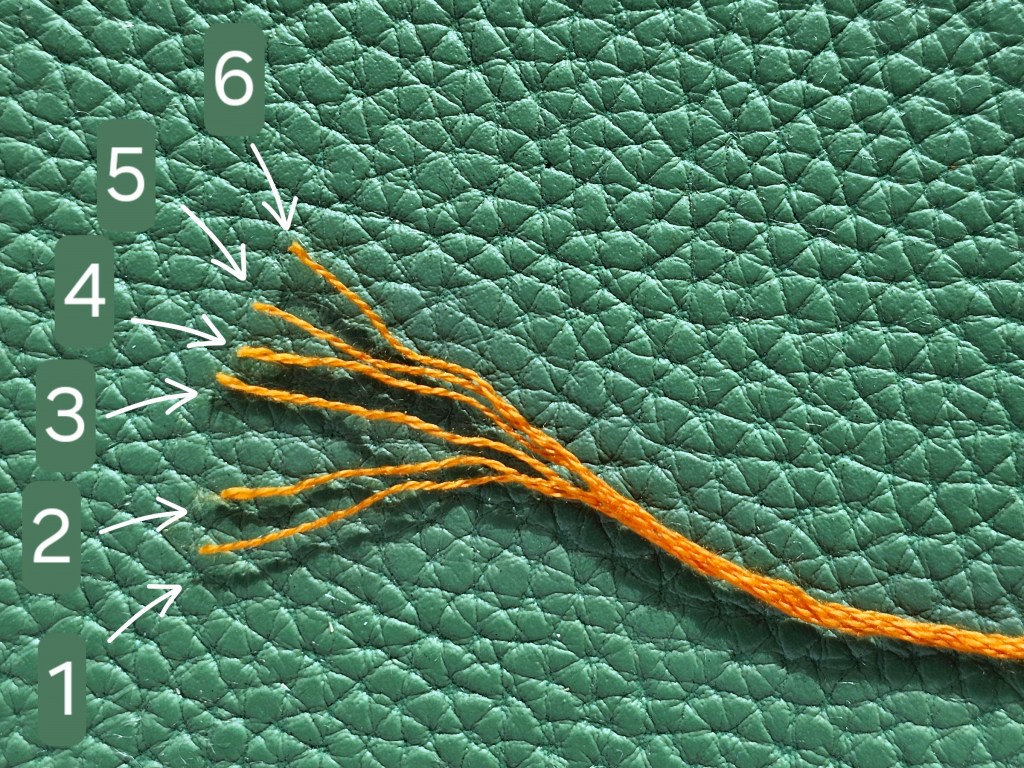
Separating the thread
Typically, an embroidery thread is made of 6 strands. Before you separate it, make sure to check in the pattern how many strands you should use. I most commonly see patterns using 2 strands at a time, but I’ve seen ones calling for 3 or 1 strand.
If you have a very long thread – for example, a full skein – cut off a piece that will be manageable to sew with. I personally find that pieces longer than 80cm get tangled easily. Threads in assorted cross stitch kits are usually pre-cut to a manageable length.
Once you have your thread in a reasonable length and you know how many strands you need, it’s time to separate the thread. Look at one end of the thread and roll it in your fingers to make the strands fan out a little. Then, identify the strands you need – 1, 2, 3 or however many the pattern requires. Aim to pick strands naturally next to each other, as they will be easiest to separate. Pinch your selected strands with fingers of one hand, and the rest – with fingers of the other hand. Gently pull the groups away from each other to separate the thread into two.
Be careful not to pull the threads with too much force – they might tangle. If you do it gently and slowly, they should separate smoothly.
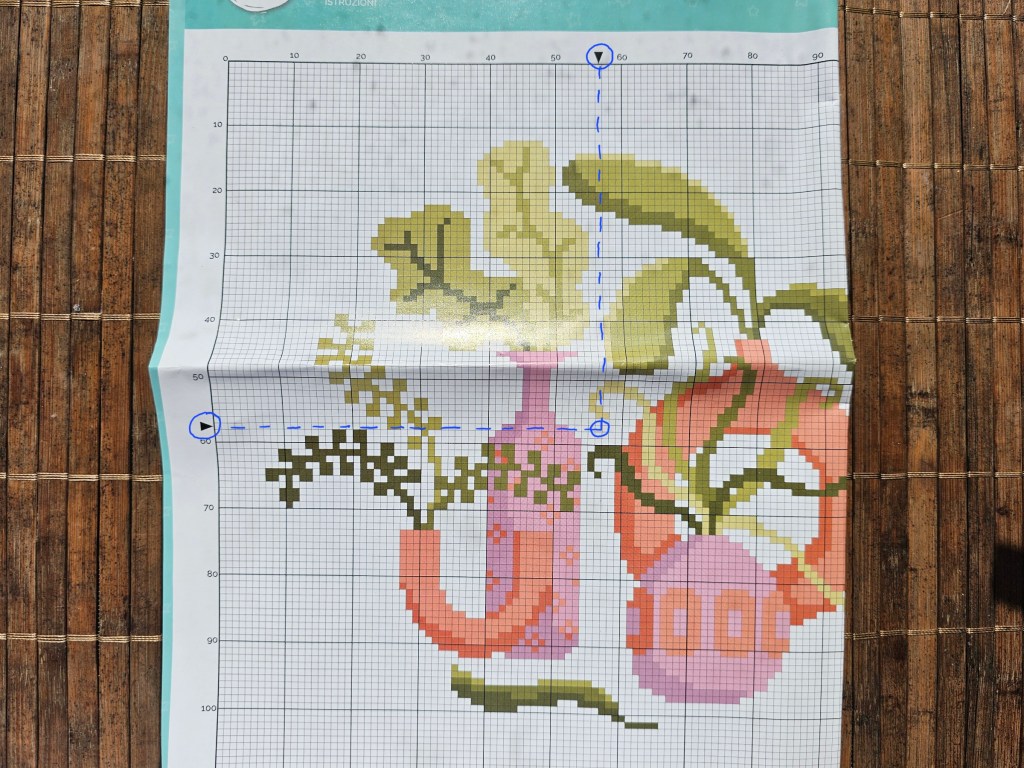
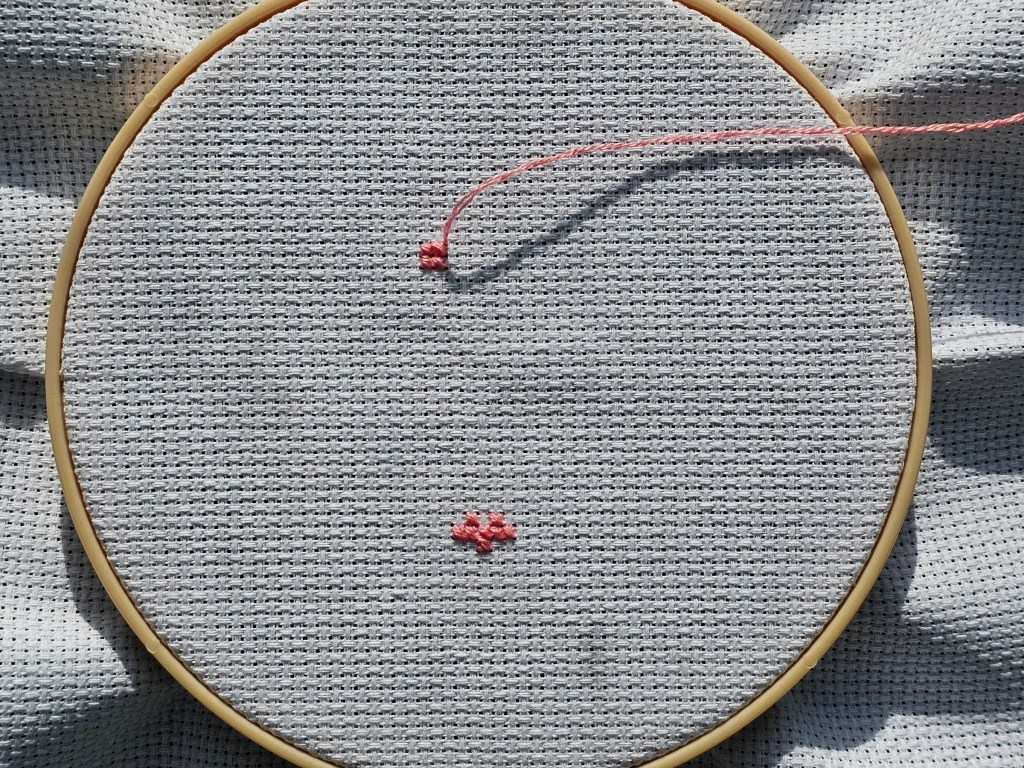
Finding the centre of the design
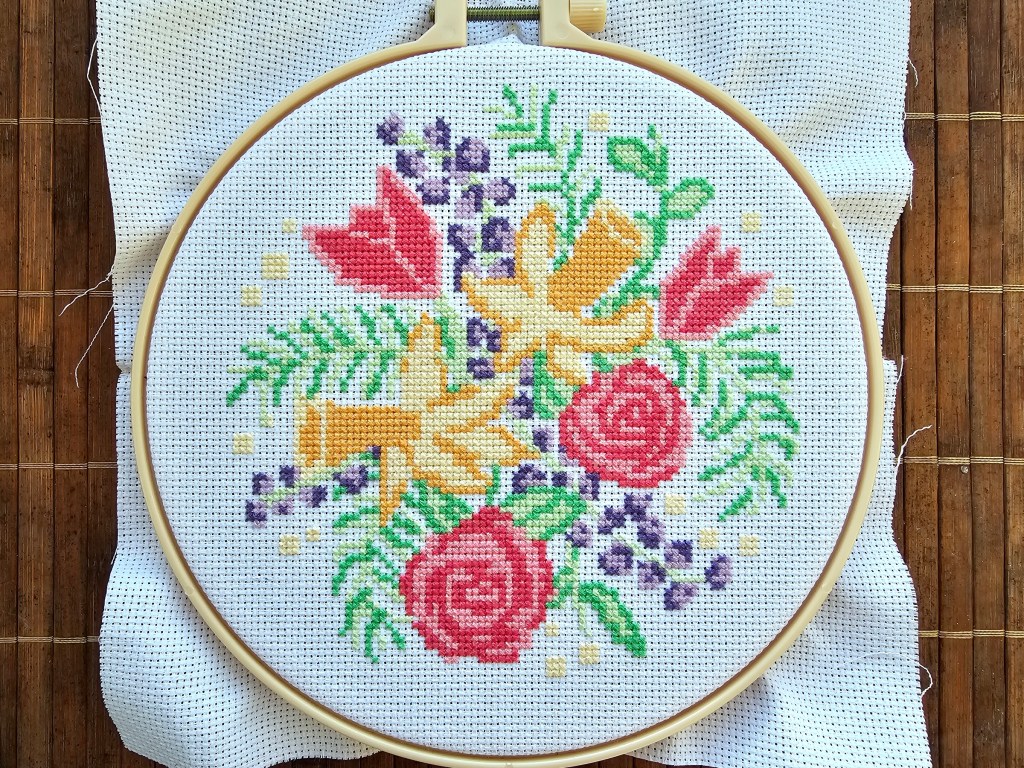
Now, it’s time to find the centre of the design. You don’t have to be perfectly accurate, it’s fine if you’re a few stitches off. Some patterns will mark the centre for you. For example, this botanical pattern has arrows marking the central row and column. You can use them to find the middle of the design. In this case, the central square is actually empty.
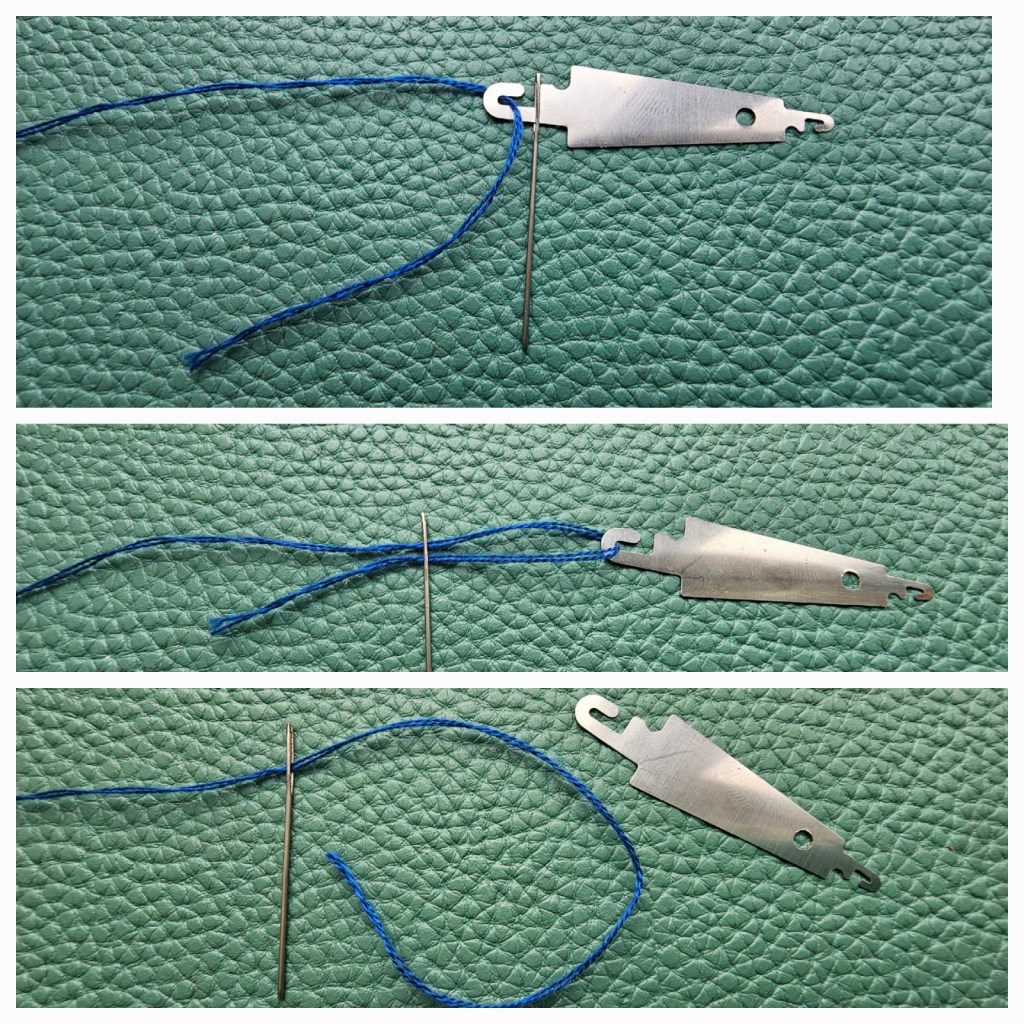
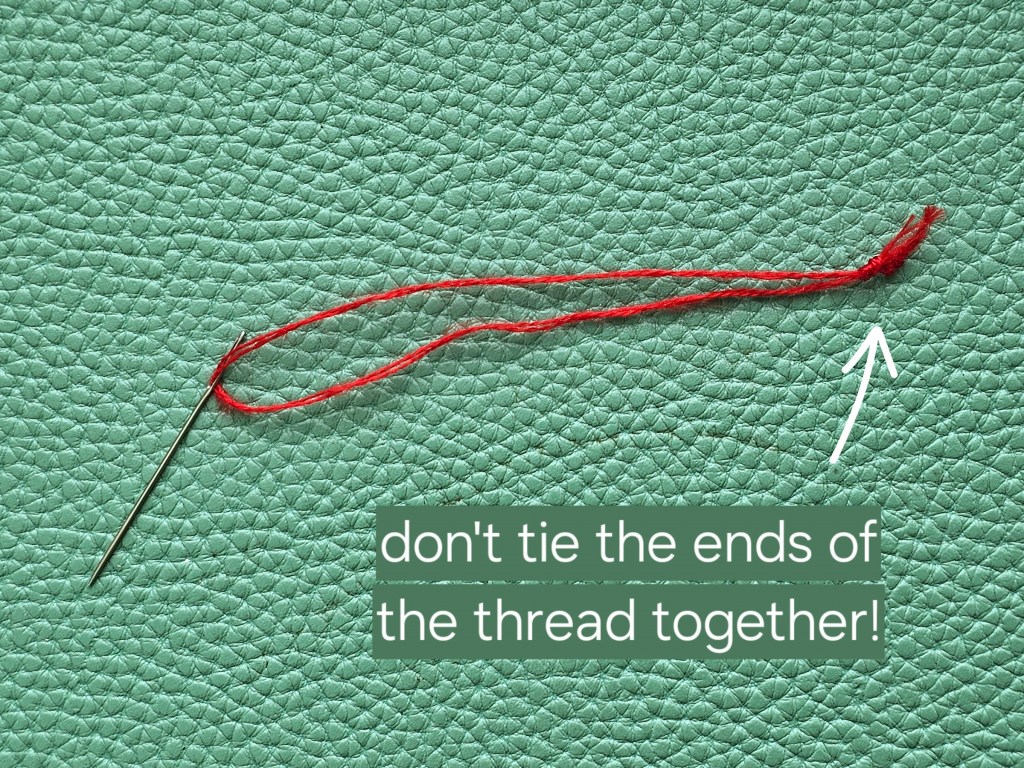
Threading the needle
Once you have the right number of strands separated from the main thread, it’s time to thread the needle. You can use a threader if you have one.
Pull the thread through the needle so that the needle is close to the middle of the thread, but one tail is a few inches longer than the other. Don’t tie any knots! Both ends of the thread should be loose, with no knots.
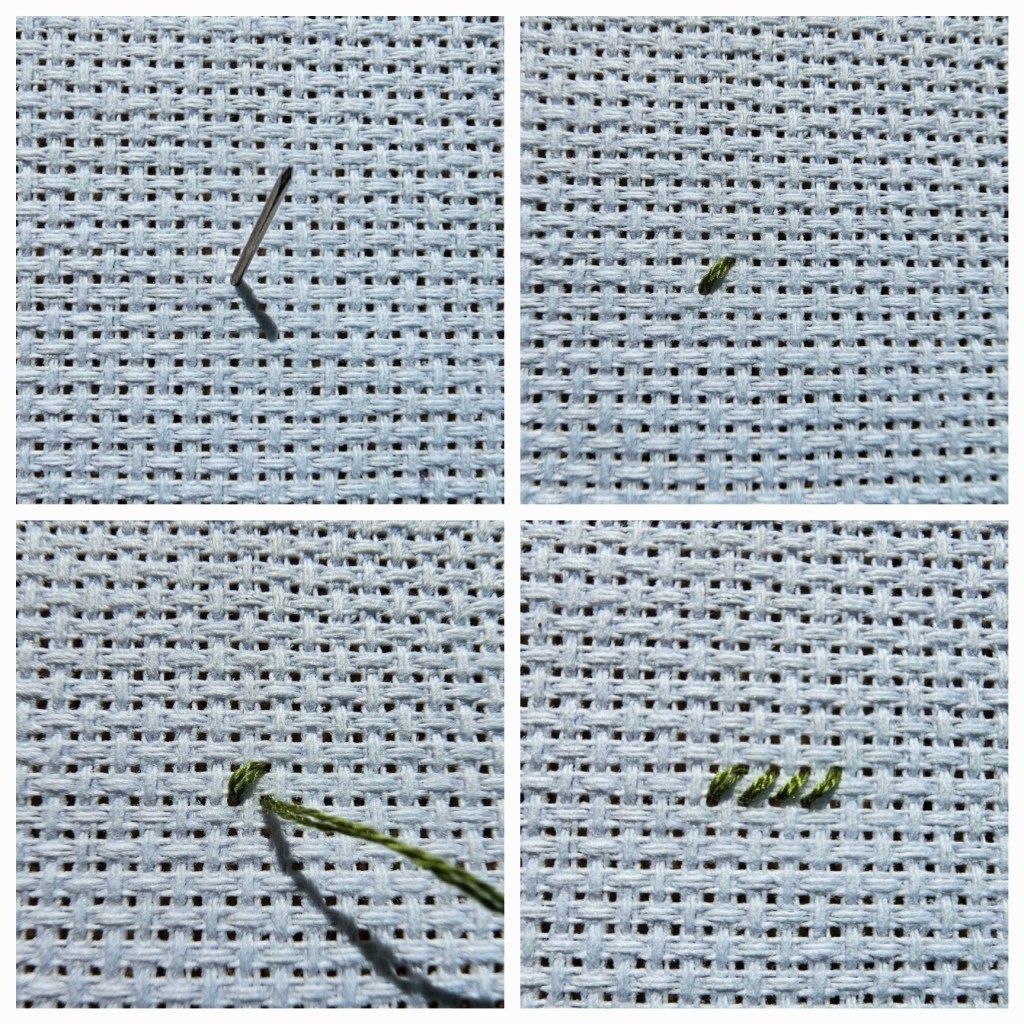
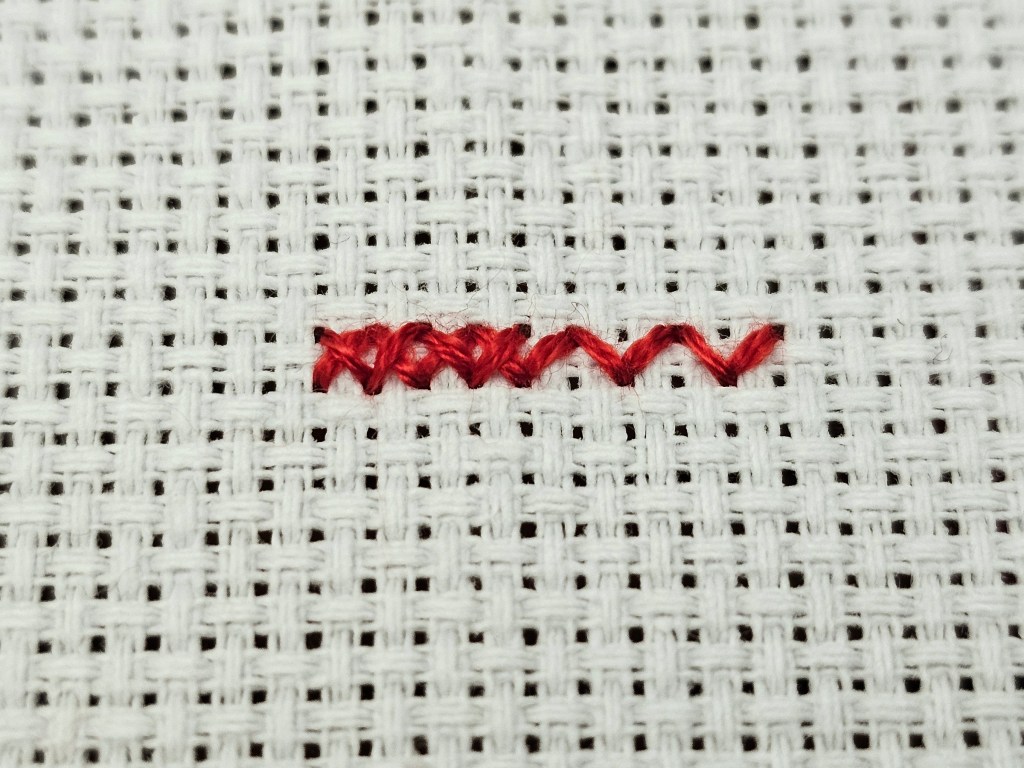
First row of stitches
So, you’ve found the centre of the pattern and you have the needle threaded with the right number of strands. It’s time to start stitching!
Locate the central point of the canvas. Don’t worry if you’re a few stitches off, but try your best to guess it right.
In my example pattern, the central square was empty. I looked for the nearest large block of colour, which was the row of green stitches 2 squares down from the central square. There are 4 green stitches in that row.
I usually sew from left to right and then back. Start by making one half of each cross, and then add the second half on the way back.
To make the first stitch, carefully push the needle from the back to the front of the canvas, through the bottom-left hole of the stitch you’re making. The shorter tail of the thread should come through to the front, but make sure to hold the longer tail at the back of the aida.
To complete the first half-stitch, push the thread from the front to the back, through the top-right hole of the working stitch.
To make the second stitch, once again push the needle from the back to the front of the canvas, through the bottom-left corner of the second stitch. Then, push the needle to the back through the top-right corner of the second square.
When you alternate pushing the needle through the front and back of the canvas, make sure to sew around the tail of the thread at the back of the aida to secure it in place.
Continue making half crosses to the end of the row. In our example, we’re aiming for a row of 4 diagonal stitches.


This is what the first row should look like on the wrong/back side:

Continuing with further rows
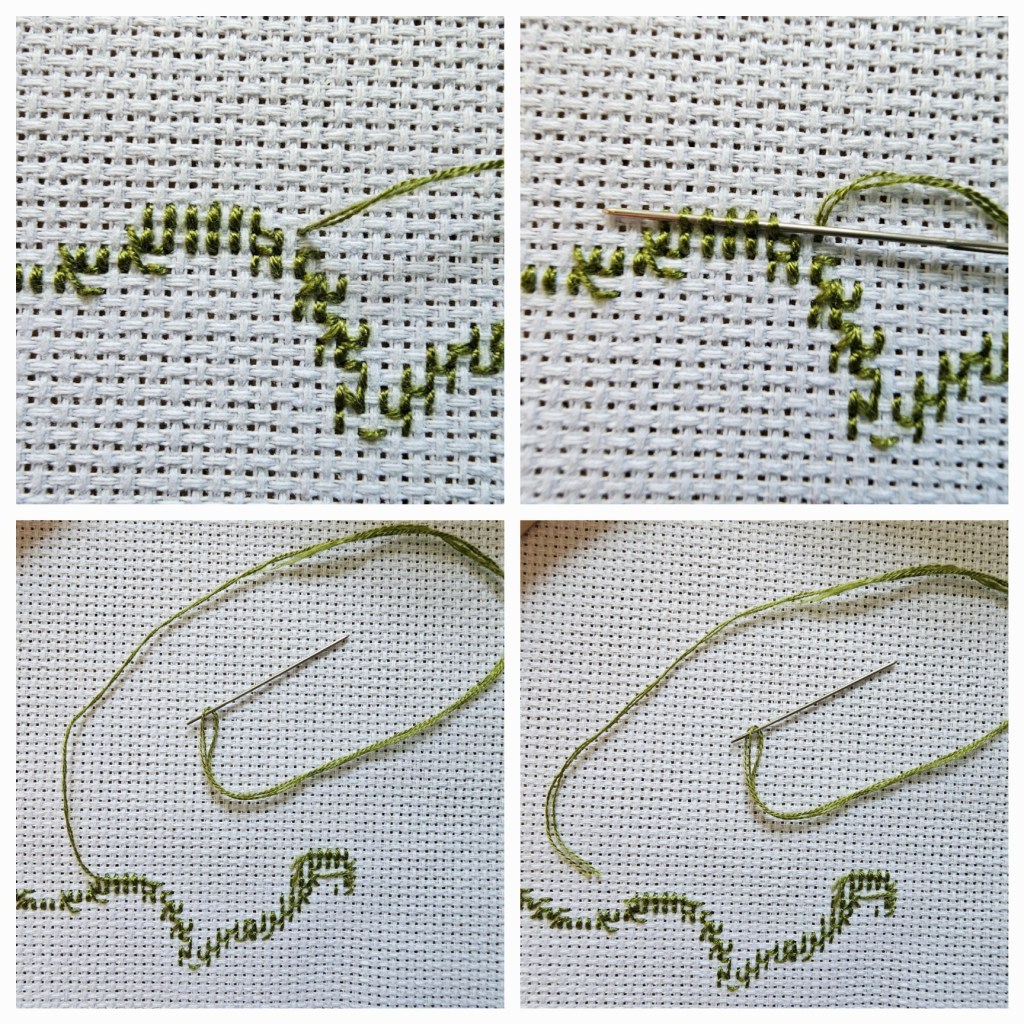
Once you’ve finished the first row, move a row up or down and continue with the same pattern. Make sure to stick to a consistent direction of stitches. Each cross has a top and bottom stitch – make sure all bottom stitches run in one direction, and all the top ones in the opposite.
Finishing a block of colour
Once you’ve finished sewing a block of colour and there are no more squares nearby that call for the same colour, it’s time for the final stitch.
At that point, the needle should be at the back of the canvas. Pull it through a few loops at the back of the aida to secure the thread in place. Then, cut the thread. No knots needed!
Most common cross stitching mistakes
Not separating the thread
The main mistake that most beginners make is sewing with the full thread, without separating it into strands. After all, if you’ve never cross stitched before, why would you assume that the thread isn’t ready to use in the shape it’s sold?
If you attempt cross stitching with all 6 strands of a traditional embroidery floss, the stitches will likely be very tight and look like knots or bumps. It might be difficult to pull the thick thread through the holes of the fabric too. You might question whether you’re doing things right, but it may not be obvious that the thread needs separating into strands.
I made this mistake myself, and it took me some Googling to figure out why my cross stitching looked questionable. Don’t make that mistake! Most cross stitch patterns include the information about the number of strands of thread to use. Most often, it’s 2 or 3.
Leaving a gap between squares
This mistake is easy to spot, and you’ll notice it straight away. I did it when I first started cross stitching and my first row of half-crosses had noticeable gaps. Easy mistake to make, but even easier to notice.

Tying the ends of the thread
When I first started cross stitching, I instinctively tied a knot at the end of the thread, to secure the needle in place and prevent it from sliding off the thread. It may be convenient for other sewing projects, but it’s not great for cross stitching. When you tie the ends of the thread together, you end up sewing with double the strands that you need.
Tying a knot at the end of the thread
When you start stitching, it might be tempting to tie a knot at the end of the thread, to help keep it on the back of the canvas. I don’t recommend doing that.
Cross stitch aidas have holes, and you’d need to make a huge knot to stop the end of the thread from going through the hole. That huge knot would then make a bump on the back of the canvas, which might be noticeable on the finished project. We don’t want the final result to be uneven!
Securing the end of the thread under the first few stitches – as illustrated earlier in the post – is a perfectly reliable way of keeping the thread in place, and it helps keep the canvas neat and flat.
The same applies when you want to end a block of colour. Once you’re done sewing, don’t tie any knots at the end of the thread. Instead, pull the needle through some of the stitches on the back side of the aida, as illustrated before.

Crosses in different directions
Sticking to a consistent direction of stitches makes the final result look neat. Each cross consists of two stitches, and it’s important to make sure that the bottom and top stitches are always the same. Personally, I always place the bottom stitch between the bottom left and top right corner, and the top stitch between the top left and bottom right corner. It’s okay to do it the other way round, just make sure to stick to the same order throughout the whole project.
Wasting yarn
The final common mistake I’d like to mention is wasting yarn. Imagine a large design which includes two small blocks of pink colour, on far ends of the design. In theory, you could thread the needle, complete the first block of pink stitches, and then instantly start sewing the second block, without cutting the thread. In that scenario, there will be a long piece of pink running across the back of the project. It’s a waste! You’ll use less yarn if you cut the thread after finishing the first block, and then start fresh on the other end of the design.
If two blocks of the same colour are close together, it costs less yarn to just keep sewing instead of cutting the yarn – every time you finish or start sewing, you need to secure a short piece of thread in the back to hold it in place. It’s always best to consider whether cutting and securing the thread to sew two blocks of colour separately will use less or more yarn than just running the thread at the back of the design between the two blocks.


The best cross stitch projects for beginners
If you’re looking to start cross stitching, I highly recommend assorted cross stitch kits – you can find them online and in hobby stores. Some of them can be pricey, but you can also find affordable options – I often buy assorted cross stitch kits in TKMaxx, for around £3-£4. Assorted sets are a great option because you don’t need to worry about buying all of the tools and supplies individually. Instead, you buy a kit that includes a fabric, threads in selected colours, needles, and the pattern – and often, also an embroidery hoop. Cross stitch kits can be hit or miss. For example, this Christmas set was the worst I’ve had – it came with insufficient thread. But overall, I’ve completed dozens of cross stitch projects from assorted kits, and I highly recommend them!
Happy stitching!
I hope this comprehensive cross stitch guide helps at least one person trying to get into cross stitching. It’s a fun and relaxing hobby, but it can be a little confusing when you start. Let me know if there’s anything else you would like to see in this guide, I’ll try to keep this tutorial useful for anyone looking for advice. It took me ages to compile this guide, and I hope it helps one of you. Happy stitching!
Also see: